Thursday, June 20, 2013

NEW CHEESE PRESS!!!!
 
I have to admit I have been bad.  I did not make any cheese in April or May.  I think I was just discouraged because the cheese press I had was cumbersome and difficult to work with.  But lo and behold my wife gave me new press, a dutch cheese press for Father's Day.  I was very excited and it worked great.  I think it looks so great that I don't mind it being out on the table, not sure if my wife agrees with me.  So I made some cheese that very same day.  I also taught a Mozzarella class early this month.  I had donated for a work charity event a cheese class for 5 people.  So I taught the class to my co-worker and her daughters.  We did 2 batches during the class and they both turned out (with a little bit of coaxing) and we all had fun.
 
My first cheese I decided to make with my new press was my favorite, Manchego (to read about my first Manchego and some history go to this post).  I changed the recipe a little bit this time but not by much.  It is a combination of the recipe found in Ricki Carroll's book "Home Cheese Making", Mary Karlin's "Artisan Cheese making at Home", and a few of my own changes.
 
 
Recipe:
  • 3 Gallons whole Milk
  • saffron threads (some boiled in water)
  • 1/4 tsp. calcium chloride in 1/4 cup cool water
  • 1/8 tsp. Buttermilk Culture
  • 1/8 tsp. Mesophilic Culture
  • 1/4 tsp. Thermophilic Culture
  • 1/4 tsp. lipase in 1/4 cup cool water
  • 1/4 rennet tablet in 1/4 cup cool water
-Heat Milk and saffron to 86°F
          -Add Calcium Chloride and stir
          -Sprinkle in all cultures, let hydrate 3 minutes then stir in a up and down motion
          -Let sit covered for 45 minutes at the 86°F
-Add Lipase Powder and stir gently
-Add Rennet and gently stir with whisk
          -Let sit covered for 30 Minutes (or until clean break)

-Cut curds into 1/2 inch cubes and let sit for 5 minutes
-Cut curds into rice size using whisk
         -Let sit for 30 minutes
-Heat curds slowly to 104°F increasing temperature slowly and gently stirring (over 30 minutes)
-Let Curds sit for 5 minutes
-Line cheese mold with damp cheesecloth and ladle curds into mold
-Press at 15 lbs. for 15 minutes (See how nice and easy this was, because of the leverage I only needed a 5l lb. weight in order to get to 15 lbs.)
-Remove cheese and flip, returning it to mold and press again at 15 lbs. for 15 minutes
-Repeat process again and press at 15 lbs. for 15 minutes
-Flip cheese again and press for 30 lbs. for 8 hours
I love my cheese press!  Thank you wife!
-Put cheese into a salt water bath and brine for 6 hours
-Pat cheese dry and age (I will age it for 2 months but you can age it from 3 weeks to 12 months)
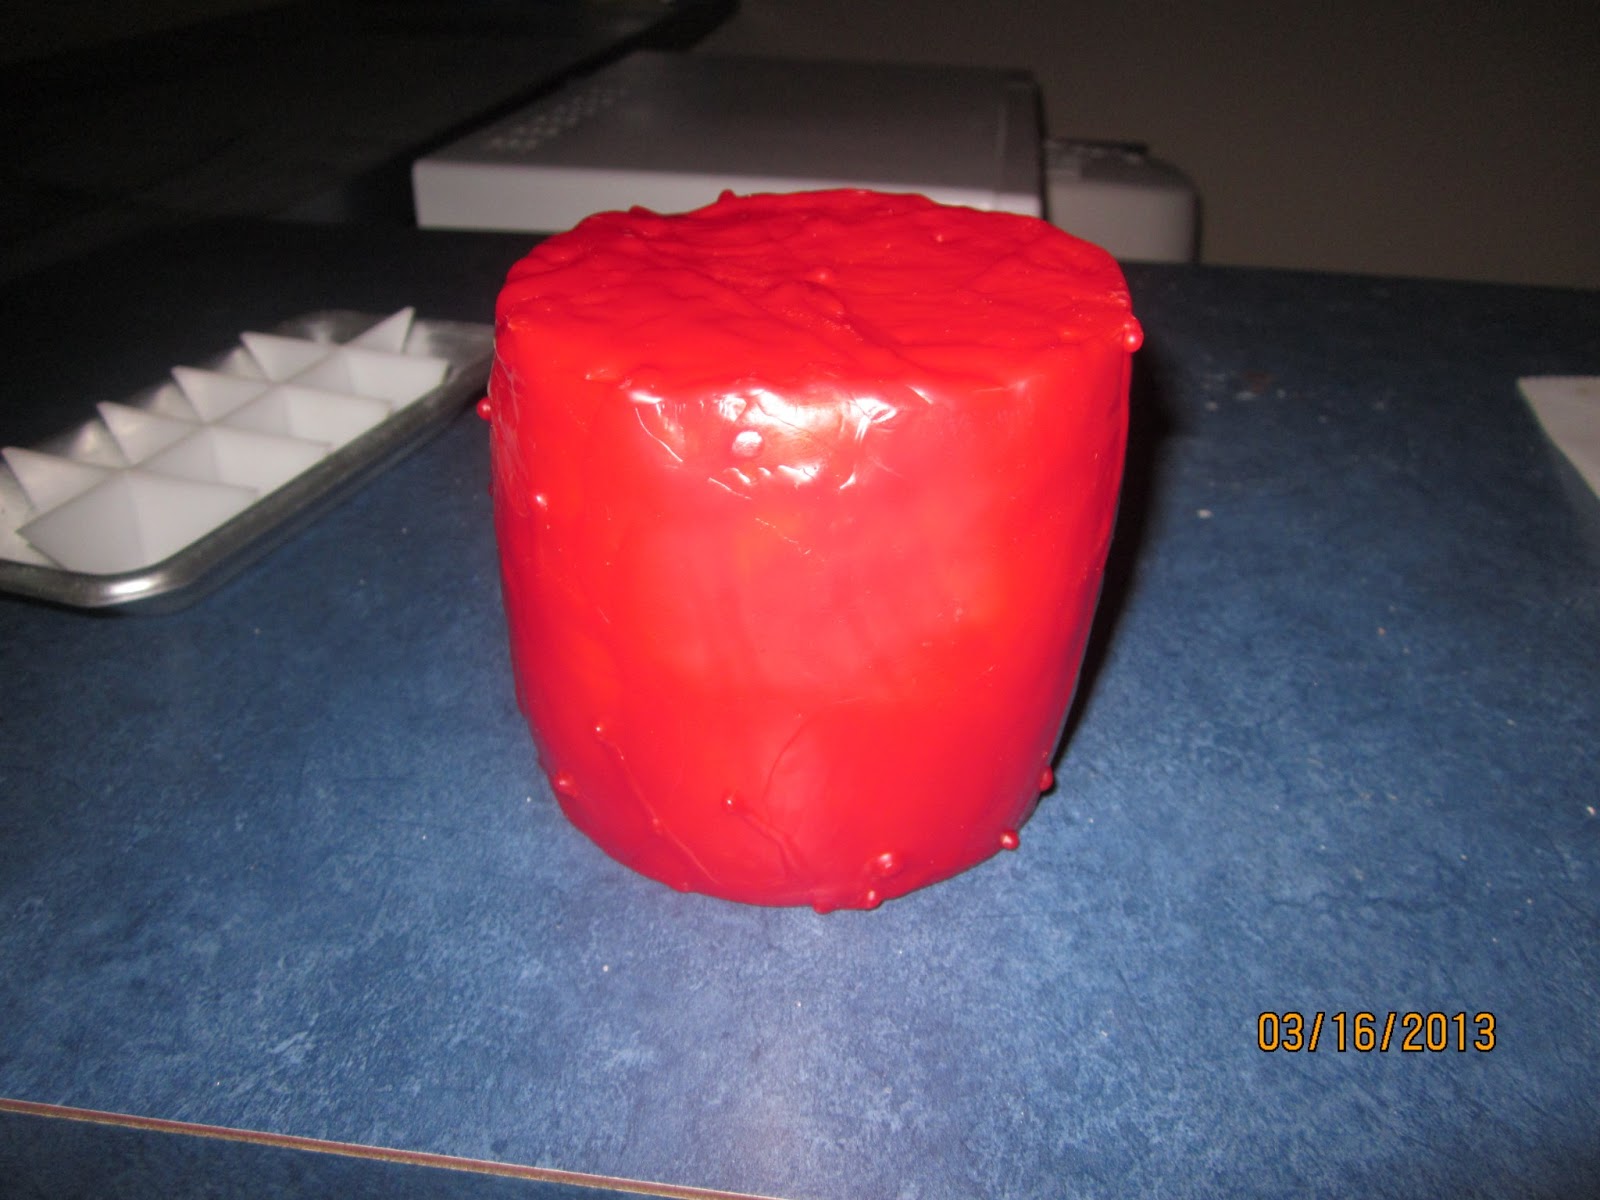
my final product, I think it looks great
This was a previous Manchego. I think my new press makes the cheese so much better
 
 
I really enjoyed my new press and how easy it was to press the cheese without it coming out lopsided.  I am already planning on making some cheese again this weekend.  Not sure what I might do.  Most likely a cheddar or a Parmesan.  Or if I get any votes or suggestions before then I might change my mind.


Saturday, March 16, 2013

2013, The year of the Cheese!

Don't get mad. I know, I know.  It has been a while since I wrote about cheese making.  It has not been that I have completely stopped making cheese.  In fact this year I have a goal to make one cheese a month.  Now if I can just get in the habit of writing up a blog post afterwards.


January-
     In January I made a Parmesan in hopes to break it open for Christmas 2014.  I have made a parmesan before and so I hope this will be just as tasty.  I can not find the pictures I took but I will make sure to post some pictures on here when I open it up in 7 months.  I decided I need to make Parmesan more often then once a year since I hate waiting for so long before I get to try it.  Maybe I will try it again in April.


February-
     I made an English Cheddar. I have not made an official Cheddar yet.  Only Farmhouse cheddar.  I got the recipe off of Cheesemaking.com.  You can see the recipe here.  I hope I will get some good mold growth.  From reading the recipe and looking at other pictures I think it does look very rustic.   I could only find the pictures I took of bandaging it.


Here is a picture after a month of aging.  I have a little white mold, and a few specks of dark mold on it.  I hope it continues.  Not sure if I will cut it open in May when I parents come to visit.  I might wait longer.  We shall see how patient I am.

  
March
 I was looking for something new to make.   So I was looking through Ricki Carrol's book for something. I live in Kentcuky and the Kentucky  Derby was in three months so I thought to I should make it.  I know it has nothing to do with Kentucky and is an English Cheese.


Hope everyone enjoyed my pictures and sorry for not blogging much about the experience.  Hopefully April will be much better.

Monday, September 24, 2012

Mozzarella Cheese Class
 (1st Attempt)
I work in a 25 floor office building and every year we do a large United Way fundraising campaign.  This year I was selected to be in charge of our floors activities.  Our goal is to raise $12,000 (which is a 50% increase over last year) if we raise that amount by this Friday (9/28, which is also my birthday) I will be shaving my head.
Well for one of the activities I volunteered to teach a Mozzarella Class. I had never done one before but have shown some family members how to make it. So I thought it would be easy.  I limited the class to 20 people and was charging $25.  Well the class filled up really fast, so much so, I had to offer an extra class because I had close to 40 people wanting to go.   Below are the pictures from my first class.  My next class is on 10/3 and I have learned a few things I will do differently.
For this class I got a lot of stuff donated by a company that works for us.  I made the below bags to give to each student.  It included 1 rennet tablet, some citric acid, a thermometer, and a pair of playtex gloves for handling the hot curds.

The next picture you can see the set up.  I was a little over adventurous and tried to make 4 batches of cheese.  I figured 4-5 people per batch would allow each person to have some hands on experience.  The only problem was that I could not watch and help each team all the time.  But we had fun.  While the milk was warming I gave a short presentation on cheese making with some history and basics.  I also showed them some of the tools I use (cheese press, muslin cloth, etc...) I use for my hard cheeses. At the bottom of this post you can see a video of my little presentation.  As it turned out only one of the 4 batches turned out to be mozzarella like.  Another one after some work was able to be sliced, but the other two were more like spreads.  Not sure what happened, but it was bound to happen with an unfamiliar kitchen, and so much happening at one time.  The stove really through me off since I was not sure how hot the elements were getting.


A few of the people in my class trying to make some cheese.  You can see that most of them have their purple gloves on.


This is one groups that did not turn out.  One problem was that I was not very patient.  The were not getting a very good clean break so I had them put the pot back on the stove to warm it up since I was afraid it never got to the 90 degree temp.  But then I forgot about it for a little bit and it got to warm.  They were never able to get very good curds to form.


One of the groups


This group is the one that actually had their mozzarella turn out, except we were not able to get it very stretchy.  The strange thing was that at first it did not look like it was going to turn out.


I had a lot of fun doing the class and hope all the participants did too.   I think for my class on 10/3 I will only do two batches.  One that I am doing while the rest of the class works on the other one.  I think it was a little to much happening at once in a space not big enough for us.

All in All it was a great time.  I will be giving one of the people in the class a Mozzarella Kit from www.cheesemaking.com.   I will post pictures of my 2nd class after is is over.  Thanks yo all that attended and I hope they have some success when they make some at home.


Sunday, September 9, 2012

Summer

 
So it has been several months since I posted.  Though I have made a few cheeses I have not made as many as I wanted too.  But you know how it goes with summer time things tend to get busy.  Anyways I am going to try and report a little bit on what I have done this summer with cheese.  But since I am having a hard time finding my pictures this could be a short post. 
 
 
As I said earlier this year my parents were flying in from Utah for a visit and I was trying to get several cheese's ready for them to sample.  
 
 
Brie-  I did a 3rd attempt at Brie, I think I did better this time then my other two times but not yet perfected.  I need to try and do one for Thanksgiving.  The goal is to flip it with out breaking the rine. Below is a picture of the 3 bries I made.
 
Manchego-  This one I added some herbs to instead of saffron.  The saffron one is still my favorite but this one was okay.  I did not add enough herbs to make it taste much different.  Manchego is becoming one of my go to cheese's becasue it has a short age time period and it tastes very good.  Especially when you use a buttermilk culture as your mesophilic culture
 
Cheddar-  This was my 2nd attempt at cheddar and was not as good as my first.  For some reason the cheese came out very sour like.  My wife says it will taste great on a baked potatoe.
 
Cheese curds-  I also tried making some cheese curds while my father was here since it is his favorite cheese.  They were better then the first time I made them but they did not quite firm up quite like I had wanted them too.
 
 
One thing exciting that I am doing is teaching a Mozzarella class.  At work I am part of a fundraiser for United Way and I offered to teach a mozzarella class.  I am planning on a class of 20 people and charging $25 each.  We will make 5 batches (4 people per pot) of cheese and the students will go home with some of the harder to find ingredients (rennett and citric acid). This will be my first time teaching.  I hope to have a friend taking pictures that I will then post on here. 


Sunday, May 27, 2012

Another Jarlsberg


So I made another Jarlsberg out of 3 gallons of milk.  I made one a few months ago which I now realize I never blogged about.  I thought the last one tasted good and hope this one does too.  I am however, having a hard time getting the more rounded shape of a Jarlsberg and I will have to wait and see if this one has the characteristic large eyes (holes).


The ingredients I used: 
  • 3 gallons whole milk
  • 1 1/2 packets thermophilic starter
  • 1/4 tsp propionic powder
  • 3/4 tsp calcium chloride in 1/4 cup water
  • 3/4 rennett tablet in 1/4 cup water
  • salt
I first heated the milk to 92°F.  Then added the culture and the propionic powder, after letting it sit for 5 minutes I mixed the milk well with a whisk.

I then turned off the heat, covered the pot and let sit for 45 minutes.

Next I added the calcium chloride whisking it into the milk and then the rennet.  Maintaining the milk at 92°F I again let it sit for 45 minutes.

At this point I got a clean break


After the clean break I cut the curds into 1/2 inch pieces and stirred for 20 minutes with a spatula.  And then allowed the curds to settle into the bottom of the pot for 5 minutes.


I then heated some water to 140°F in a separate pot and removed the whey to the tip of the curds


Next I added about 2 cups of the 140°F water into the curds to bring the curd mixture to 100°F.


Then over the stovetop I heated the curds to 108°F over 30 minutes while stirring the whole time, once you get to the correct temperature I let it sit for 20 minutes.

I next ladled the curds into a damp muslin cloth and let drain for 5 minutes through a colander.


Then I put the curds into my mold and pressed the curds at 10 lbs for 30 minutes then flip and 15 lbs for 8 hrs.  After which I put the cheese into a salt water brine for 8 hours.


Now it is sitting in my cheese fridge for aging until my parents get here at the beginning of July.  The cheese looks a lot better then the other two times I have made Jarlsberg.  Lets all hope I get some eye formation. 

Look for a blog around the 4th of July, where I will report on this cheese as well as the Manchego.


Sunday, May 13, 2012

 Saffron Manchego


So my parents are travelling to visit us from Utah the beginning of July and so I have been busy trying to make several different cheeses for them to taste.  Recently I have made Brie, English Cheddar, Jarlseberg and Manchego. Most of these cheeses that I have made before but am hoping to perfect a little bit.  Today I will blog about the Manchego, lets hope that I am diligent this week and blog about the rest of them.  With the Manchego I used:
  • 2 gallons whole milk
  • 1/4 tsp buttermilk culture (normally it calls for mesophyllic but thought I would try something new)
  • 1/4 tsp thermophillic culture
  • saffron threads (I diffused them in water over the stove top first)
  • 1/4 tsp lipase powder in 1/4 cup water
  • 1/4 tsp calcium chloride in 1/4 cup water
  • 1/2 rennet tablet in 1/4 cup water
  • olive oil
  • paprika


First I heated the milk to 86°F then turned off heat and added both cultures (waiting 5 minutes) and stirred with a whisk.  Letting it next set for 45 minutes.

Next I added the lipase, gently stirring it, and then the calcium chloride and the rennet.  Then I let it sit for 30 minutes, at which point I got a clean break.


After the clean break I cut the curds into 1/2 inch pieces, waiting 5 minutes and then stirred it with a spatula for 30 minutes allowing the whey to drain as well as the curds to firm up.

I then slowly heated the curds to 104°F (over about 45 minutes) then let it sit for about 5 minutes. 

I then let lined a colander with damp butter muslin and ladled the curds into the muslin, allowing the curds to drain for 15 minutes.

Next I put into my cheese press.  As you can see below I have changed my cheese press a little bit.  I had a hard time guessing on the weight when I was using a spring.  So know I am just using some weights.  It took a little bit of taking apart my press so that it could work.


After pressing it for over 8 hrs at 30 lbs I put it into a salt water bath for 8 hours.  


It is now aging in my cheese fridge until my parents come in July (aging will be about 2 months total).  As I have mentioned in my other posts on Manchego you can eat it in as little as 10 days or can go much longer, just depends on how you want it to taste.  When it is does aging I am going to try and rub it with smoked paprika and olive oil.


Sunday, March 18, 2012

Soft Cheese Fun


I have used Ricki's book before but I had just borrowed from the library and not been able to dig into it.  This past month my wife got it for me and I was very happy.  I have decided to try and make as many recipes from it as possible over the next year.   The best thing is that you all get to accompany on on these fun cheeses.
Last week I made two cheeses with recipes basically found in "Home Cheese Making" by Ricki Carroll.  I have not ordered my new supplies yet so I found two I could do with the ingredients I had.  I choose to make a cheese called Lactic Cheese and some Cottage Cheese.


The first recipe in Ricki's book is Lactic Cheese.  It tasted very close to a cream cheese to me and tasted good on some bagels.  It made a lot of cheese.  1 gallon of milk made a little over 2 lbs of cheese.  I have to come up a with a few recipes this week to use all the cream cheese in.

I used:
    1 gallon of whole milk
    1 packet of mesophillic culture
    4 drops from rennet dissolved in 1/3 cups water

I first started by heating my 1 gallon of milk and the mesophillic starter to 86ºF
Then I added 1 tsp of the diluted rennet mixture and gently stirred.

   
I then let it sit in the pot with the burner turned off overnight, approximately 12 hours.


Overnight the milk had turned into a very loose yogurt like substance.  I then poured the mixture into a muslin lined colander.  As you can see I barely had enough room, this recipe made so much more then I expected since most of the cheeses I make follow a 2 gallon = 1 lb instead of the 1 gallon = 2 lbs this had.


I then left the bag to drain for about 12 more hours (while I was at work).  I drained a lot of whey during this time.


After draining I flipped the muslin inside out into a bowl.  At this point I just added some salt.  You can ad a lot more types of ingredients but being my first time I did just salt and have used it mainly on bagels in the morning.  It has a great taste with just the right amount of tanginess.  I believe I will make this again when I have family visiting since it is a cheese you can see the fruits of your labor quite quickly.


Since this cheese was so easy in the process I made a 2nd cheese at the same time. So I made homemade small-curd cottage cheese.


This cheese does not even use rennet.  I guess that is why it takes so long for the curds to form.  The ingredients I used for this cheese was"
    - 1 gallon 2% milk
    - 1 packet mesophillic starter
    - 3 tbl cream

I first heated the milk to 72ºF and then added the mesophillic starter, mixing thoroughly.


I then let it sit overnight and most of the next day, about 24 hours at room temperature. I then cut the curds into 1/4 inch cubes and raised the temperature to 100ºF over about 15 minutes and then let it remain there for about 10 minutes while stirring occasionally.  I then raised temp to 112ºF over another 15 minutes and leave it at that temp for 30 minutes.  The process is cooking the curds I had which were very weak and soft and making them more firm.  After the curds were firm enough I let them sit for 5 minutes.  


I then poured off the whey into a cheesecloth lined colander.  Picture below is not very good of the curds hanging to dry.


Here is a another picture of the curds hanging to drain more whey out.  I let it drain for about 10 minutes. 

I then dipped the curds into cold water for 5 minutes.  Next untie the bag and break up the curds into small pieces and add salt.  This tasted okay but not as good as the lactic cheese.  It was a little more sour then I liked and I did not get the creamy mixture you usually get when eating cottage cheese. I may just need to add some plain milk next time after it is all done to get that mixture.  This made a little over 1 lb of cheese.


On too my next part of this blog which will be shorter since I had no pictures.  About a month ago we had some family friends over to make cheese.  The friend was actually in the cheese making class with me that started this whole thing.  But since then they had moved and been to busy to get too much into the cheese making.  This friend is also hopefully getting a goat here in the spring which will be lots of fun once I can get some milk from it.

We made mozzarella together but also for him to see some of the process of a hard cheese is made.  So before they came over I started the process of making a Colby.  Which was a brand new cheese for me.  The part was fun, we made two mozzarella, one for me and one for his family.  They both turned out really good.  However the Colby did not turn out too great.  It is really salty and has a bland flavor.  I thing the reason is because I was trying to use a different mold to get the classic shape of a Colby but it was to small so I had to make another one with my other mold.  This equated into 2 -1 lb bricks of cheese that I put into a salt bath that was meant for a 2 lb brick of cheese.  With more surface area I think the salt was able to penetrate the cheese too much.  Here is a picture of the finished cheese after it was waxed and aged.

I hope to try doing Colby again in about two weeks.  Wish me luck. I also hope to try Brie again as well as make two more recipes from the first part of Ricki's book.  Maybe Fromage Blanc, Mascarpone, Gervais, English cheddar, or other.  Leave a comment and tell me which ones you think I should make.