After getting my cheese making in the kit from the New England Cheesemaking Supply Company I was anxious to try out a hard cheese. The only problem is I have to be a little patient since hard cheeses take some time to age, some like Parmesan take 10 months!!!. So for my first cheese I told Farmhouse Cheddar, mainly because I only have to let it age for 1 month. I guess we will have to see if I can wait that long.
I first started with all the ingredients below. The big red brick is the wax that I will melt to cover the cheese (I will blog about that later). You can also see the mold I will be using to shape the cheese. And then right in front of the milk in the square packet is the live culture that is the secret to getting the right taste. It is called mesophilic culture and is used for low heat cheeses. This is all so very exciting.

Here is my ingredient list:
2 Gallons Whole Milk
1 packet direct-set mesophilic starter (or 4 ounces prepared mesophilic starter from New England Cheesemaking)
1/2 teaspoon liquid rennet (or 1/2 rennet tablet) diluted in 1/4 cup unchlorinated water1 tablespoon cheese salt
I first put the 2 gallons into my new stainless steel pot and that into a bigger stainless steel pot with water in to create a double boiler. I set the burner to level 2 and slowly warmed the milk up to 90 degrees. The water on the in the outer pot was around 94 degrees. This took about 15 minutes. I then added the culture and covered for 45 minutes. This I was able to do by just removing it from the heat and it stayed at the 90 degrees.
After this I added the rennet and slowly stirred the diluted rennet into the milk. I put in on the burner for a little bit to warm the water back up to 94 degrees then took it off again and let it sit for 45 more minutes.
 |
| My double boiler |
After letting the milk set for 45 minutes the curds had formed and I got a somewhat clean break. I then had to cut the curds into 1/2 inch cubes I did this by taking a long knife and cutting the cheese one way with 1/2 inch between each cut I then rotate the pot 90 degrees and cut more lines 1/2 inch apart. I then needed to cut he cheese underneath the surface so I just did not have very, very, very long cubes. To do this you angle the knife at a 45 degree angle and using the previous lines cut to make the 1/2 inch cubes.
Next I heated the curds slowly to 100 degrees (about 3 degrees every 5 minutes) I kept the burner between level 2 to level 3. This is called cooking the curds, allows the whey to be released from the curds.

At this point I scooped the cheese curds into a piece of cheese cloth and then hung it up off our cabinets for 1 hour to let all the whey drain out.
 |
| Do you like my little bungee cord |
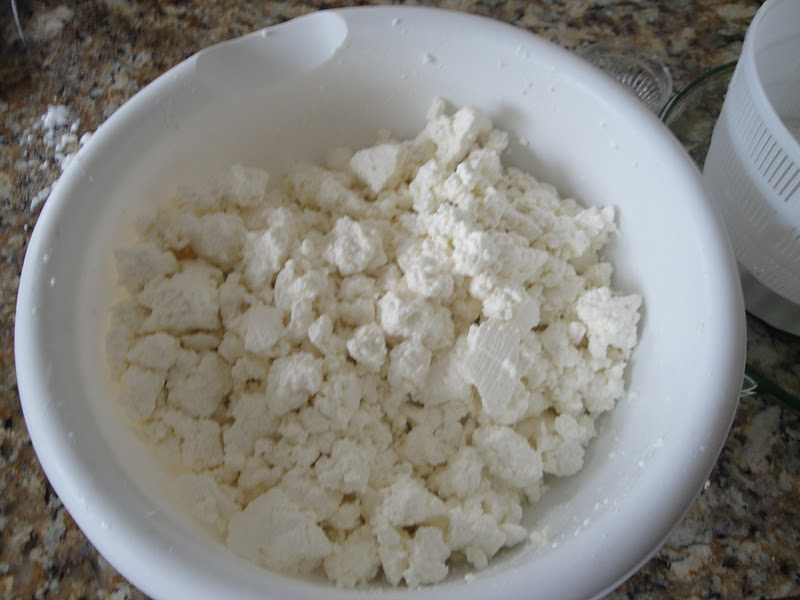
Next you break the compressed cheese into walnut size pieces. Here is the picture when I just started breaking up the cheese

Here is a picture after I was done breaking up the cheese. I then added the salt and mixed it around. At this time I could already tell it was different from the soft cheeses I have already made by just the smell of the curds.
Since I do not have an actual press, I hope I will eventually have one, I had to make one. I did this by putting a little custard dish upside down into a pie plate and set the mold on top of the custard dish, this allows the whey to drain without keeping the bottom of the mold wet.

Here you can see the mold entirely filled ot the rim with the curds. You can also see the whey already begining to drain.

TO press I first needed to out 10 pounds for 10 minutes. For my improved press I used two bricks in a big tuppaware container. Then I took the cheese out (that was lined with cheesecloth) and flipped it. Then I had to put 20 pounds for 10 more minutes. This took 4 brick and again flipping the cheese

After that I needed to do 50 pounds for 12 hours. Since I was worried about the 10 bricks falling over and put my whole made up press into my big pot that kept everything from falling.

After waiting overnight this is what it looked like.


Now I just need to wait 3-5 days as it airs out. I also cut the block in half that way I can try one half after the required 1 month of aging, and then let the other one age longer. Tomorrow I plan to wax the two halves and letting age downstairs in a little fridge at around 50 degrees. Today, after it has sat for 3 days, it already has a very nice cheese aroma.

Also below you can see I was able to make a decent amount of ricotta from the left over whey. About 2 cups. So out of 2 Gallons of whole milk I was able to get about 2 pounds of Farmhouse Cheddar and about 2 cups of Ricotta.

2 comments:
Nice job on the cheese and on your post! it is very interesting. I guess you guys are having a lot of pasta for dinner... :D
how much longer until you can eat it!!??
Post a Comment