Sunday, July 31, 2011

Ricotta, Ricotta, what to do with all this Ricotta

So last night after making the mozzarella and ending up with a bunch of ricotta I started thinking to myself.  What am I going to do with all this Ricotta, if every time I have whey I can make ricotta.  We used in it salad, and put it on crackers, but after a while that could get old.  So it a cheese making book I have there was a recipe for Ricotta Pancakes with Banana Pecan Syrup.  The recipe is from Paula Lambert's "the Cheese Lover's Cookbook and Guide".  The only change I made was that I also used walnuts since I did not have enough pecans.  They were good.  The girls and I liked them.  They were moist and the syrup was really good.  It also filled our Sunday morning with the smell of bananas, nuts, and the all important butter.

2 Cups flour
1 tablespoon sugar
2 tsp baking powder
1/2 tsp baking soda
1/2 tsp salt
2 eggs, separated
2 cups milk
1/4 cup homemade ricotta

For the syrup
2 tablespoons butter
1/2 cup chopped pecans
2 bananas
1 cup maple syrup

  • Mix dry ingredients
  • In separate bowl beat egg whites until stiff but not dry
  • In large bowl beat egg yolks, milk and ricotta until smooth and then add dry ingredients gently with a large spoon.
  • Fold in the egg whites.

For syrup
  • Melt butter in a skillet over medium heat
  • Add nuts and saute for about 1 minute until fragrant
  • Add bananas that have been thinly sliced, stirring for about 2 minutes
  • Add the syrup and cook for 2 minutes longer, until the syrup is hot and slightly thickened.
The pancakes were good, but Daisy was a little concerned before she ate when I told her I had made cheese pancakes.  She told me she did not think that sounded good and wanted her cheese to be on the side.

Keep tuned for tomorrow's post where I will post about my 3rd attempt at making mozzarella that I tried this evening.

Finally Mozzarella, well..... almost.


Last night I tried my hand at making homemade mozzarella again.  This time I used a full gallon and had a good thermometer that worked.

Here is my ingredient list this time:

1 Gallon Milk
2 tsp Citric Acid
1/4 tsp Rennet, diluted in 1/4 cup cold water
2 tsp salt


As you can see from the picture above I am also using rubber gloves, last time I learned that when you microwave the cheese it gets very hot.  This recipe is suppose to take only 30 minutes, but for me it probably took closer to an hour, it may be because I am heating up the milk slower then I am suppose to or something.

First step was to mix the milk with the citric acid and warm it up to 88 degrees, at that point you put in the rennet and then warm it up to 105 degrees.  I thought I was doing good at this stage until when I got needed to put in the rennet.  The thermometer read 88 but when I moved it to put in the rennet it registered closer to 100, I guess my post is not doing a good job at warming the milk evenly.  So I only had to leave it is a little longer and it was up to 105 but in some areas only up to 100.   So I need to figure out the best way to get the milk to read close to the same temp no matter where in the pot it resides.

After it got to 105 I took it off the heat and let it sit for about 5 minutes.  It look much more promising this time because I was able to get a clean break, this is where you can put your finger into it the curds and pull it out with out having a lot milk residue on your finger.  Though it did not look quite like yogurt like it is suppose too.


I then scooped the curds out with a slotted spoon into a microwave safe bowl.  I was able to get much more curds this time then last time.  I then formed the curds into a lose ball and drained as much whey as I could.  I then microwaved it for 1 minute removed it and formed the cheese into a ball again (this is where I needed the rubber gloves) and then draining off they whey.  I did this two more times for only 30 seconds.

By this time the cheese had started to get more stretchy.  I then started kneading it and pulling it.  At this point I put in the salt.  I was able to get a somewhat smooth ball of cheese that tasted very close to mozzarella.  We ended eating it with some tomatoes with a basil and balsamic topping.  I thought I had done okay but was a little disappointed that it only produced a rather small ball of cheese.


 After I was done I searched the Internet for videos of people making mozzarella to see how much cheese they yielded from 1 gallon of milk.  They seemed to get much more than I did and when they took the curds out it was in much bigger pieces then what I got.  After some searching I think I might know what my problem was (at least I hope).  I have been using Kroger milk and I think it has been ultra pasteurized.  Which kills the living enzymes in the milk and allows milk to keep fresh longer.  So at 10:45 last night I ran out to the store to buy some milk that comes from a local dairy in hopes that it will work better.  I will hopefully try that tonight

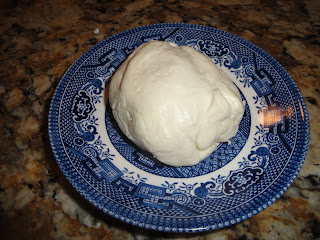
But back to what I did with all the whey left over from the mozzarella.  I of course made some Whey Ricotta.  I don't want to waste the milk.  So I made it again much similar to the way I have before.  I was able to get quite a bit of curds out of the whey and make a nice chunk of Ricotta.  It tastes good and I ate some last nigh with some slices of tomatoes.  This morning I also used some of the ricotta for breakfast.  Look to a future post to see what I made for breakfast with the Ricotta.

Tuesday, July 26, 2011

1st attempt at Mozzarella

This past week we went to a very unique store called Jungle Jim's.  People call it a foodies paradise because they have almost any type of food you can imagine.  The purpose of the trip was to get some cheese making supplies.  We bought citric acid, rennet, and some muslin cloth to use as a cheese cloth.  I wish they would have had some cultures but oh well, I guess I will have to order those online.

To make Mozzarella I used the following:
  • 1/2 gallon of whole milk
  • 1 teaspoon citric acid
  • 1/8 teaspoon rennet dissolved into 1/8 cup water
I put the milk and the citric acid in my enamel pot, (I decided to try doing it without using a double boiler).  I started to slowly heat the milk to 88 degrees.  The only problem was that when I went to grab the digital food thermometer I found out it did not work and that the other two food thermometers (a meat thermometer and a candy thermometer) do not go down to 88  degrees.  So I thought I would just go by  feel.  So when I thought it was 88 I put in the rennet and started heating the milk up to 105 degrees.

Here you can see the curds and whey separating.  After it got to what I thought was 105 degrees I took it off the heat and let it sit for a few minutes.  In this recipe after you let it cool down you spoon all the curds out with a slotted spoon into a microwave safe bowl.  I did this but could never get very much curds.  After you do get enough curds you are suppose to put it in the microwave and a few other things.  Since I did not get enough curds I decided to make ricotta.  In most cheese recipes you can use the whey to get some whey ricotta.  So I heated the whey up to 200 degrees using the meat thermometer.  I took it out and put it into the muslin cloth.  And set it up to hang.  This allows the whey to completely drain from the curds.


After letting it sit for about 10 minutes I took it out of the muslin and actually had my first succes in cheese making.
After putting a little salt on it it tasted really good.  The next day we had a salad using the ricotta and fresh tomatoes from our garden. It tasted really good and I even took some to work the next day.  I was very excited to finally have some success even though it came from a failure.  A good lesson in never giving up.

I plan to try Mozzarella again this weekend after buying a new thermometer.  I look forward to hopefully getting it right this time.

To answer a question asked on my last post.  Parm will take about 10 months to age.  I will just put it downstairs in my basement in a small fridge we have down there.  Out of sight, out of mind.  What I think will be harder is when I do a cheese like a cheddar that you only have to age for 1 month but the longer you wait the better it gets.  I think I would be very tempted early to taste it. I guess I will just have to make enough to split the batch into different "aging" blocks.  One to use soon, one to use in 6 months, and maybe one to use in 1 year.  But for both of these I will have to wait till I get a cheese press.


Monday, July 25, 2011

There is a first time for everything

In my first adventure in making cheese I used only the items I had in my house, since I did not have any Rennet, Citric Acid, or Cultures, I made a very easy cheese that almost anyone can make, Ricotta.  The ingredients I used were:
  • 1 Gallon Whole Milk
  • 2 squeezed lemons
  • a little bit of vinegar
  • various spices (I will comment on these later)
One problem I had with this first experience is that I was only slightly following a recipe from a book while at the same time trying to repeat the processes I learned in the  2 hour class I took at my local library.  All I did was warm the milk up on the stove using a doubler boiler after it reached a temperature (I was told in class what temperature this was but currently do not remember) I took it off the stove and added the lemon juice and the vinegar.  Almost instantly I could start seeing the curds and the whey separating. This could be seen by a slight yellowish liquid forming on top.  After letting it sit there for 15 minutes I poured it into a cheese cloth that was sitting in a colander.

This I think is were my 2nd problem occurred.  Since the cheese cloth I had was not very finely woven and appeared to me to have large gaps I decided to use two different sets of cheese cloth in order to catch all the whey.  In short the curds ended getting caught in between the two cloths.  After letting it sit and drain out for a little while I put what I could into a  bowl and seasoned it with salt and other spices.  This is my third issue.  When in the class I took the man teaching seasoned his but when we sampled the cheese I could not taste the different spices very well so I decided to put some more in.  The problem being that I used dried spices and he had used fresh spices.

So all in all this first attempt at making cheese did not turn out.  While it tasted "okay" on crackers it really was not very good.  But do not fear, I did not let this get me down, I am staying strong in my desire to become I good cheese maker.  I look forward to the day I eat my first cheddar or first Parmesan.  Keep reading to find out about my next adventure "Mozzarella".

The Beginning of my Cheese Journey


Hi, my name is Dannon.  For several years now my wife has been telling me I need to get a hobby.  She likes to paint and draw, but I do not have the patience for something like that.  Usually I just read books and I tell her that is my hobby.  Well recently I saw a poster at our local library about a cheese making class.  I like cooking, I like cheese, and I like doing things that most people don't know how to do, so I signed up.  In the class we learned the philosophy behind cheese making and made Ricotta cheese during the class.  It was fun and so begins my journey.

This blog will be a chronicle of my cheesy adventures.  From the mistakes to the successes, from the discovery of my own recipes to tips on how to get into cheese making yourself.  As I begin this journey the only equipment I have are things found in any kitchen in the United States.  I have an oven, I have pots, I have a ladle, I have milk, and I have vinegar and luckily I had some cheese cloth my wife happened to have.

In each post I will tell you about each of my cheese making escapades, and hopefully fill it with pictures of the process.  Enjoy and I hope you too will realize how truly easy it is to make your own cheese.